Arduino Sensor Sucess

September 18th, 2010 No comments

Do-it-yourself culture is moving from the area of home renovations and bike repairs to making your own computer controlled gadget.

Makerspaces and Hackspaces are proliferating around the world as more individuals realize they can create a small machine to do the exact tasks that they want.

One of the most popular small brains that are used to control these gadgets are Arduino Boards, The brain on the board is not as smart as your phone but, there are a lot of things it can do.  A good place to start finding out what other ingenious inventors are up to is the Make Magazine on-line. Yes, some of the projects are awesome and complete instructions can usually be found to duplicate the results.

Inspired by the cool projects other people were making, I decided to use the Arduino board to make a sensor that would control my computer when I am using it for music or video performance.  There are several places that Arduino boards are available on-line, and the SmartProjects company that makes them has a listing of distributors and retail outlets.

I was planning to go to an educational workshop in Troy, New York where I would have an opportunity to work on using this technology. I did not know if anyone else would be trying out Arduino boards, but I was confident that I could get it to work.

I live in Vancouver, Canada and I could buy a lot of Arduino products from Lee’s Electronics on Main St. but, I was worried about taking the boards through US customs. Since the homeland security staff are checking Canadians very closely, I decided to order the boards in New York and have them shipped to the university where the workshop was held. I could imagine trying to explain to a suspicious customs agent that I was using these computer parts for a multi-media project. Why bother to risk missing my plane, when Adafruit is one of the largest dealers of do-it-yourself Arduino goodies in the USA and they have a lot of helpful information on their site. They are located in NYC, so I ordered from them.

I had investigated Arduino boards by attending an evening at the local Vancouver Hackspace. The denizens of the place were mostly drawn from a pool of programmers who wanted to do something more fun with their skills than making sure the heating system in your office building works. They were very used to working with this type of code and they moved very fast. However, I was convinced that I could do this if I had the time to research. Trial and lots of error usually works in the end.

I went off to the workshop and the boards were delivered as planned.

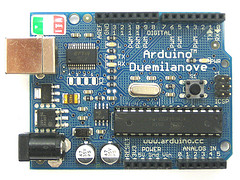
I had done quite a bit of research and I knew there were different types of Arduino boards. I ordered two: the Duemilanove (pictured above) and a Boarduino clone kit. The Duemilanove is the basic Arduino, so I thought the most information would be available and It would be the default for the program to upload the code. I bought the Boardino because I liked the idea of the breadboard being a part of the unit and I thought it would help me understand the system if I actually built one. Unfortunately, the kit did not cme with a breadboard, so I have not tried to make it yet.

Adafruit Boarduino clone

Adafruit Boarduino clone

With the boards, I also purchased two types of power supplies, one that plugs in the wall and one that uses batteries. This was because I didn’t know how I was going to be using the unit and I thought it might be good to have the battery power available. I also bought a selection of sensors: Infra-red distance sensor, motion sensor and some small sensors that measure tilt and heat. I also bought a few LED lights and some connector wires (male and female). The total bill was $150 USD – my budget for this project.

When I go to Lee’s and buy the breadboard I will do a post on making the Boarduino.

It might have been more economical to buy the starter pack, but I did not need another USB cable – the wires did seem important, so I bought male and female connectors. Read more…

Related Images:

Voltaic Software for HD USB Video Cam

January 17th, 2010 No comments

At the end of 2008, I purchased a Blu-Ray Hitachi video camera with a built in mini DVD burner. I thought this was a wonderful technology because, not only did it have the 30 GB hard drive, but if you ran out of space or wanted to create a back-up file, the rewritable DVD was at your service. The image was taken from the Hitachi site and my camera is the shiny silver one on the right.

I immediately ran into problems because the compression system used on the camera creates m2ts files, a file type that could only be opened and edited with the very basic software from Pixela that came with the camera.

This software had few conversion options, no titling and basic edit functions with no transitions. The editing features in the camera were just as as good. Even home movies should look better than this!

When I went to Banff, I used the music dept’s Sony and Pauline and Ione’s Canon HD cameras because they store information in mts format. The mts format is readable by Final Cut Pro and can be converted into useable 1080p HD video with no loss of quality.

Despite the best efforts of the video experts at Banff, my camera was useless because the files could not be converted into an editable format such as AVI or Quicktime mov.

In September of 2009, almost a year later, I decided to try to use my video camera again. I wondered if some kind of conversion software had been developed. There had been some advances in that Windows movie player would now play the uncompressed m2ts files, but it would not convert them to wmv. VLC media player would convert in Ubuntu, but only to SD. There were several other conversion software brands available on the internet, but they all either converted to SD, produced artifacts or other visual problems or had no sound.

Enter Shedworx Voltaic conversion software!

This software works to convert my m2ts files to editable formats with a number of options of output. I just upgraded to version 2 and there are even more conversion options that re-compress for iPhone and other video applications as well as for editing in professional software.  It also includes an editor and will automatically upload edited movies to your You Tube account.

I have not tried all the new features, but the conversion is rock solid and I have been producing Blu-Ray quality films on the Apple Macintosh version. I understand the newest version of Final Cut will convert m2ts files now, but for those of us on a budget, the $39.99 USD price tag for Voltaic is a lot more economical than an upgrade of FCP for $299 USD.

Another problem with upgrading is the new FCP will only run on the intel chip and requires a newer operating system. Voltaic is working great on the Power PC quad core G5 with 10.4.11 Tiger.  It is really expensive to keep up with the latest and greatest Apple offerings, so Shedworx gives the indie film maker a chance to produce in Blu-Ray without having to recycle a wonderful, working computer.

Thank you Shedworx, for providing me with a free upgrade to 2.0 because I bought my copy of the software late in 2009! This is a very generous program for a software company and I am happily using my new update today.

Related Images:

M-Audio Delta44 Cards finally working in Ubuntu 9.04

October 11th, 2009 No comments

As a devoted Ubuntu user, I always tell the skeptics that in Windows or Mac OS, I have to pay money for my operating system and applications, then I have to do their beta testing for them. In Ubuntu, if you can fix it — it is yours with no need to pull out the credit card.

I was challenged when I upgraded from Ubuntu Gutsy 8.10 to Jaunty 9.04 in May 2009,  because my trusty M_Audio Delta 44 sound cards refused to make any sound except in the Audacity application.  I went into “Tech Mode” and started checking out the Ubuntu Forum. I found some confirmation that I was not alone in this post HOWTO: PulseAudio Fixes & System-Wide Equalizer Support. I also found a lot of information on ALSA here.

There was no quick fix for me so I submitted a launchpad bug report 425435. Read more…

Related Images:

Net Tuesday Meet-up

October 7th, 2009 No comments

There is a really interesting group in Vancouver that has been formed through the “Meet-up” networking site. The “Net Tuesday” group purpose is to support non-profits with technology information and to share information. Part of doing “Tech Help” is keeping up with the nuts and bolts of Google Tools, so I decided to see what I could learn.

This particular meeting was the first one I attended and it was worth it to be able to go through security in the new CBC building. The plexiglas security gates will star in my next lo-budget sci-fi film for sure. Only moving pictures will reveal the wonder of it all.

The topics this evening were:  Google AdWords with Omar Al-Hajjar, Search Marketing Director for Magnet, a division of  Cossette West and Google Website Optimizer with John Hossack of VKI Studios.

As I have been posting AdWords on my site and considering advertising myself, the Google Ads presentation was timely. The Website Optimizer was a tool that I had looked at, but decided that I do not have enough traffic to use. Both presenters were very informative and it seemed like a great collection of people attending. Read more…

Related Images:

Nexstar 3 Drive Enclosure How-to and Mac Warning

September 20th, 2009 1 comment

External hard drives have been the most helpful item that I have purchased. I admit that I buy many of them and particularly now with high definition video where files sizes are large and a 30 Gig camera drive can uncompress to 10x in size depending on the final file type.

This post will serve two purposes:

1. How to install a hard drive in an external enclosure

2. Give a Warning on a problem that I had trying to use a Nexstar 3 enclosure with Mac OSX.

[I am trying out the anchor function with a new plug-in and it only works after you open the “more” tag — working on it.] Read more…

Related Images:

Categories: How-To, VIX at Work

Yamaha FJ1200 throttle stuck open

September 11th, 2009 No comments

Today I took the bus with my Pelican case full of tools and motorcycle apparel to where I left my motorcycle after it took me on a very wild ride.

I had some difficulty early Wednesday morning after I finished editing a draft CD for a client at Waterlou Studio, it was 3 am. I went out to ride my Yamaha motorcycle home, but I found the choke was stuck closed and the bike would not start. Not wanting to annoy the neighbours with repeated attempts I got off the bike and pulled on the choke knob as hard as I could, until I finally felt it slide out.

This was not the first time I had this problem, so I felt confident enough that once I started the bike, I could slide the choke in and out a few times and the choke would return to normal operation. This time the ride did not go so well. The choke was stuck on and no amount of sliding in and out was going to change that fact. The revs kept climbing until the gas was wide open no matter what I did with the throttle. An FJ 1200 with the choke stuck wide open gains speed rapidly. A few moments of excessive speed followed — as the throttle had no effect on the full on feed of gasoline into the carburetors. I killed the engine.

I managed to get the bike into neutral after a few very quick minutes. I could coast down the hill with the revs climbing out of control and me frantically pumping the choke lever and snapping the throttle. When it got so bad that I feared for my engine, I used the kill switch and cut the power to the motor. I tried all of the controls I had and started the bike again. The revs climbed to a dangerous level so I killed the engine again. After a few of these sessions, I decided that the bike must be parked, so I found an out-of-the-way spot with no signage and carefully backed and pushed the bike to a stop.

0158-FJ-parkedI was lucky to get a ride home as it was raining and cold and my friend, who had kindly given me a ride, took my waterproof  cover back and carefully covered the bike to keep off the pounding rain . . .0160-case+tools

Read more…

Related Images:

Categories: Inspiration, Uncategorized

Word Press Themes and Plug-ins

September 7th, 2009 No comments

Screenshot-Welcome to AdSense

My Tech Help blog is using the iNov theme developed by mg12. I am not sure that I will keep this theme, but I am investing work into it. After getting my feeds set up, I had decided that I was going to try Google AdSense on this blog. I finally got it to work using the WP AdSense plug-in. I also figured out that I can insert the code directly into the post by using the HTML option in the WordPress editor. The Google Custom Search still is not working properly.

I was warned that Google only allows three ad sections per page, so I now put in a “more” tag and paste the ad code beneath the tag. That way the ad on the footer counts as one and the code in the blog only displays when the reader opens the post.  This prevents exceeding the limit when the posts are attached one after another on the home page. Check it out. Read more…

Related Images:

Feedburner RSS Feed

September 5th, 2009 No comments

RSS-logoOne of the first actions I do in my fresh  WordPress install is to travel to Google and set up my new RSS feed with Feedburner.  Feedburner used to be a separate company, but now it has merged with Google and uses the same log-in account as the rest of my Google tools. RSS Feed links are usually identified with the logo at left. Clicking on the logo will subscribe to the feed from the site the logo on the page itself will also subscribe as it is linked to my feedburner account. Most blog pages and many web pages will feature this logo.

Feedburner handles all of the RSS feeds [Really Simple Syndication] from my websites. The wiki article explains RSS historically and technically, but the point for me is that the RSS feed delivers content from my site directly to subscribers.  This is a really simple RSS explanation from Feedburner. This process can be compared to a magazine subscription, once someone is subscribed they receive every issue of the magazine. Feedburner will even allow e-mail subscriptions that deliver directly to the subscriber’s e-mail box.

Most people just pick up the feed and read it in an RSS reader software that shows them a copy of each of the feeds they are subscribed to in one place. There are many very good RSS readers and most browsers will read the feed, although some may need an add-on or plug-in. Many of the most popular readers are displayed on the Feedburner subscription options page [click on the RSS button to see the page] and I would recommend that you start with one of those. It is a matter of personal taste because they all work well, but feature different options. Read more…

Related Images:

Categories: Uncategorized, VIX at Work

Life and Times

May 30th, 2009 No comments

I want to dedicate this site exclusively to the technical details behind my daily work. This includes the Live More Lightly Project and Sound+Light+Motion, my own sites and work and many other projects that I am working on.  To increase the focus of the site, content will be constrained to contain all of the technical details of my computer/technology/opensource project development.

It is still in the setting up stage, but I hope that I will be able to provide some interesting content. I also plan to have the experts who give me Tech Help post here as they are specialists in their particular area and can have some helpful information. Read more…

Related Images:

Photography Made Clearer

March 3rd, 2009 No comments

Using the CanonS2 is very different from the CanonA80 as the greater number of pixels and better zoom lens mean I have a better chance of taking a good photo. The feel of the camera is another factor and the fact that I look through the viewfinder instead of the flip out screen. I know my daughter, who takes really good photos, would argue about the screen, but for me steadiness is an issue and it helps if I have the camera closer to me. I am researching tripods, so the situation will change when I am not holding the camera, then it will help to avoid touching the camera by using a timer or remote. I also learned this from my daughter, who confided in me that she took my favourite photo of herself by putting the camera on a handy rock and using the timer.

I know that most of these ideas will seem obvious to most people who have knowledge of photography, but for a person who has spent their life in music and tapping on computers, this is an interesting new study.

My tripod research revealed the true enemy of clear, sharp photos is camera movement, even small vibrations can blur the capture. This can be compare to a pervasive hum or quick chair creak in the recording studio. Stillness of the motionless camera is the recording studio silence of photography.

Vibration must be controlled in music and audio recording too. From a physics perspective all instruments, including the voice, create sound using resonance caused by controlled vibration. As a recording engineer who works with the modern technique of sitting in the studio room instead of being isolated in a control booth, I have learned to control every sound I make. When recording, I breathe noiselessly and do not move unless absolutely required. Yoga has helped me control involuntary sounds made by digestion and to slow my heartbeat. Studio microphones will pick up a heartbeat if you are excited and allow your heart to pound, so even if you love the music, you must remain calm. Read more…

Related Images:

Categories: Video and Photography