Arduino Sensor Sucess
 Do-it-yourself culture is moving from the area of home renovations and bike repairs to making your own computer controlled gadget.
Makerspaces and Hackspaces are proliferating around the world as more individuals realize they can create a small machine to do the exact tasks that they want.
One of the most popular small brains that are used to control these gadgets are Arduino Boards, The brain on the board is not as smart as your phone but, there are a lot of things it can do. A good place to start finding out what other ingenious inventors are up to is the Make Magazine on-line. Yes, some of the projects are awesome and complete instructions can usually be found to duplicate the results.
Inspired by the cool projects other people were making, I decided to use the Arduino board to make a sensor that would control my computer when I am using it for music or video performance. There are several places that Arduino boards are available on-line, and the SmartProjects company that makes them has a listing of distributors and retail outlets.
I was planning to go to an educational workshop in Troy, New York where I would have an opportunity to work on using this technology. I did not know if anyone else would be trying out Arduino boards, but I was confident that I could get it to work.
I live in Vancouver, Canada and I could buy a lot of Arduino products from Lee’s Electronics on Main St. but, I was worried about taking the boards through US customs. Since the homeland security staff are checking Canadians very closely, I decided to order the boards in New York and have them shipped to the university where the workshop was held. I could imagine trying to explain to a suspicious customs agent that I was using these computer parts for a multi-media project. Why bother to risk missing my plane, when Adafruit is one of the largest dealers of do-it-yourself Arduino goodies in the USA and they have a lot of helpful information on their site. They are located in NYC, so I ordered from them.
I had investigated Arduino boards by attending an evening at the local Vancouver Hackspace. The denizens of the place were mostly drawn from a pool of programmers who wanted to do something more fun with their skills than making sure the heating system in your office building works. They were very used to working with this type of code and they moved very fast. However, I was convinced that I could do this if I had the time to research. Trial and lots of error usually works in the end.
I went off to the workshop and the boards were delivered as planned.
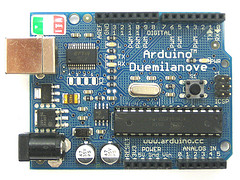
I had done quite a bit of research and I knew there were different types of Arduino boards. I ordered two: the Duemilanove (pictured above) and a Boarduino clone kit. The Duemilanove is the basic Arduino, so I thought the most information would be available and It would be the default for the program to upload the code. I bought the Boardino because I liked the idea of the breadboard being a part of the unit and I thought it would help me understand the system if I actually built one. Unfortunately, the kit did not cme with a breadboard, so I have not tried to make it yet.
With the boards, I also purchased two types of power supplies, one that plugs in the wall and one that uses batteries. This was because I didn’t know how I was going to be using the unit and I thought it might be good to have the battery power available. I also bought a selection of sensors: Infra-red distance sensor, motion sensor and some small sensors that measure tilt and heat. I also bought a few LED lights and some connector wires (male and female). The total bill was $150 USD – my budget for this project.
When I go to Lee’s and buy the breadboard I will do a post on making the Boarduino.
It might have been more economical to buy the starter pack, but I did not need another USB cable – the wires did seem important, so I bought male and female connectors.After a lot of experimentation, I was able to get one sensor to work properly with the Arduino board.
IR distance sensor w/cable (10cm-80cm)
ID : 164
This is an analog sensor and there was some code already made to get it to operate. All I had to do was figure our where the analog wire should be connected by looking at the code. The ground is clearly marked on the Arduino Board. Without a breadboard, I found the wires would fall out if the board was moved, so I would recommend soldering on a one of the male connectors on to the wire. Once I attached the connector pin, the wire stayed attached.
———————————————
The first program to try out is the “Hello World” blinking LED — the code for this is readily available and once an LED is inserted into the correct pin, it will blink on command.
I used my Ubuntu linux computer to upload the code to the board with a USB cable. The Arduino code is open source and freely available.
Good luck with your projects. There are a lot of good resources on the internet that helped me including the Arduino and Adafruit sites.


